Introduction
Restoring selective deleted mail items can be a bit tricky with Exchange 2013/2016. This blog provides an operational methodology for restoring mailbox content from a backup for multiple users when mail content has been accidentally deleted, via a script, admin action, or virus. I specifically cover the deletion of email messages containing a specific word in the subject or body of an email message.
If a virus deleted all email messages with the subject “Sales Report”, by the time the database is restored, mounted, and exported, a significant amount of time could have passed from when the email content was deleted. During that time, end-users could have performed several actions within their mailbox; delete email; move email; etc. If we were to restore mail content directly back to the mailbox, some end-user actions taken after the database backup time could revert back, resulting in end-user confusion.
A majority of the actions performed in this document can be found in this article – https://technet.microsoft.com/en-us/library/ee332351(v=exchg.160).aspx.
Mailbox Restore
Your backup solution should provide detailed steps on how to restore a database, and there are a lot of backup solutions on the market. This blog does not cover the database restore process.
Note: For every restore mailbox database, the Information Service requires a restart.
Prepare Database
In many cases, mailbox restore may not have an Exx file in the log path. Our first step is to navigate to the location of the restored database.
Navigate to the location of the restored files. Take note of the first two numbers of the log files. Each database will have a different value for those first two numbers. For example, the first database and corresponding log files would start E00; the second database’s log sequence would be E01; the third database’s log sequence would be E02, and so on.
To determine the log files required to bring the database to a clean state, run eseutl /mh against the database and note the Log Required and State properties.
Eseutil /mh <database path\database.edb>


If the State is in a clean shutdown, the database is ready to be mounted. If the State is in a dirty shutdown, perform the steps in the Bring to Clean State section to bring the database to a clean shutdown state.
Bring To Clean State
The Eseutil tool can be used to play the log files into the database bring the state to a clean state.
eseutil /r EXX /l <log file path> /d <database path/database.edb>

Once the log files are replayed into the database, the following message is displayed.
Note: Depending on how many logs are required to bring the database to a clean state, it could take a bit of time for eseutil /r to execute.

To validate the database is in a clean state, run eseutil /mh again and check the state of the database.

Clean State
Once the database is in a clean state, create a new recovery database on a mailbox server. We normally recommend using a mailbox server that isn’t actively busy, like a passive mailbox server.
New-MailboxDatabase -Recovery -Name <database name> -Server <server name> -EdbFilePath <database path\database.edb> -LogFolderPath <log file path>

Note: Once the recovery mailbox database is created, restart the Information Store service on the Mailbox server. It will take the store service offline for a few minutes.
The last step is to mount the recovery database. To mount the database, use the Mount-Database cmdlet.

To validate the database is mounted use the Get-Mailboxdatabasecopystatus on the mailbox server.

Verify Mailboxes
Once the database is mounted, check the statistics of the mailbox database or a specific mailbox. To check the mailbox statistics use the Get-Mailboxstatistics cmdlet.
Get-Mailboxstatistics –database <Database Name>

To get the mailbox statistics for a specific mailbox, use the where cmdlet.
Get-Mailboxstatistics –database <Database Name> | Where {$_.DisplayName –eq <User Display Name>}

Create Dummy Database
The reason for the dummy database and dummy mailbox is to restore all mailbox content to a dummy mailbox. Once the data is restored, eDiscovery searches will find the deleted content and restore the content to a PST or back in the source mailbox. Once the recovery processes are finished, remove the dummy mailbox and database.
Create a dummy mailbox called Dummy Database.

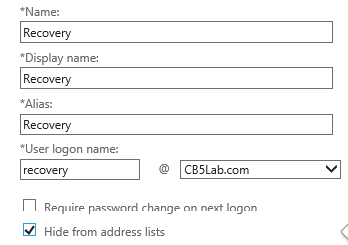
Within the Dummy database, create a new mailbox called Recovery. After creating the dummy mailbox, mark the mailbox as hidden from the GAL.
Depending on the number of users we are restoring, additional dummy mailboxes and databases might be needed.
Note: For every dummy mailbox database, the Information Service requires a restart.
Restore Mailbox
Using the New-Mailboxrestorerequest cmdlet, mailbox content is restored to original mailbox or a separate mailbox in a selective folder. To restore mailbox content to a dummy mailbox, use the command below.
New-MailboxRestoreRequest -SourceDatabase <Recovery Database> -SourceStoreMailbox <Source Mailbox> -TargetMailbox <Dummy Mailbox> –TargetRootFolder <Name of source mailbox> –AllowLegacyDNMismatch

To validate the restore request, run the get-mailboxrestorerequest.

Export Mailbox
We have two options; we can export the data directly to the user’s mailbox or export the data to a PST file. Both options are covered in this section. Choose the best option that works for each end-user.
Export to PST
To export the content to a PST file, run the New-MailboxExportRequest cmdlet.
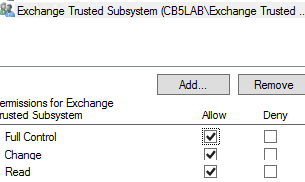
Before running the New-MailboxExportRequest, create a share on the Exchange server and assign read\write permissions to the Exchange Trusted Subsystem group.
To determine the folder that will be exported, run the following cmdlet against the dummy mailbox.
Get-MailboxFolderStatistics -Identity <dummy mailbox> | ft Identity

Now that we have a share and the folder path that we want to export, we can use the New-Mailboxexportrequest.
New-MailboxExportRequest -Mailbox Recovery -IncludeFolders “Janet/*” -ContentFilter {(body -like “*project*”)} -FilePath \\CB5LAB-ALL-2\root\Project.pst

Use the Get-MailboxExportRequest to determine when the mailbox export is complete.

PST file is located under the file share.

Only the items matching the filter, are available in the PST file.
The PST file can be shared with the end user.
Export to Target Mailbox
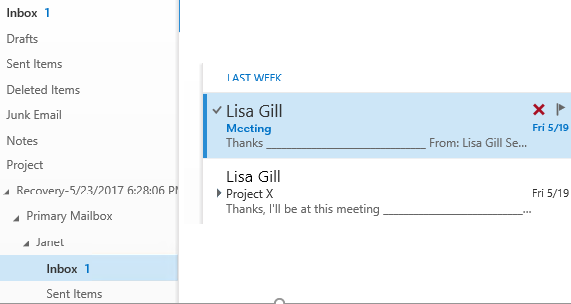
The main difference between the two methods is that a selective folder can’t be used when loading the data back into the original mailbox. Only export one mailbox at a time to the dummy mailbox. Once a restore is finished, purge the content of the dummy mailbox and then perform another restore.
To export the data of the dummy mailbox to the original mailbox use the following command.
Search-Mailbox -Identity <Source Mailbox> -SearchQuery <Project Name> -TargetFolder <Target Folder Name> -TargetMailbox <Target Mailbox>

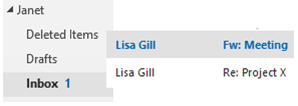
Once the Search-Mailbox is finished, the target folder and search data will be present in the mailbox under the target folder name.