Right before my trip to Japan one of my Desktop machines “died”. It’s a BitLockered Windows 7 x64 machine. Since the machine wasn’t “mission critical”, it had to wait. Now, a month and a half later during the Thanksgiving holiday, I was finally able to look into the issue. Essentially all I did was a reboot to install updates. On the way back up, it essentially said no bootable disk, press F1 to continue. How exciting…. Also, though, I’m a “Platforms” engineer, my specialty isn’t “setup”, so this took me a bit longer than I was happy about to fix it, which is why I’m discussing it here. Also, note that what I wrote below is a gross summary of what I actually did. Hopefully at least some part of this can help at least one other person.
Anyhow, back to the problem – the machine won’t boot. My first instinct was that the drive failed, since it’s happened to me so many other times. So the first thing that I did was unplug my data drive to try to isolate the issue, since I knew that no boot data lived there. After that, I booted to the recovery environment via the Windows 7 install media and pulled up the command prompt. I was able to “unlock” BitLocker (manage-bde -unlock C: -RecoveryKey PathToExternalKeyFile) and browse the disk just fine, so I knew that the hardware wasn’t the issue.
Note: You can also use the -RecoveryPassoword option to enter the 48 character recovery key in, but if you have the .bek on a thumb drive, that’s much easier.
After that, I suspended BitLocker so that I wouldn’t have to unlock it after every reboot. To do that you typemanage-bde -protectors -disable C:
Note: Even though your drive may be C: when it’s booted up, it might not be in the Recovery Environment if you have multiple disks connected to your machine. To verify what drive letter has been assigned to the drive, you can use DiskPart.
Type DiskPart – (The DiskPart prompt will appear.)
Type List Disk – (The list of disks will appear. Choose the disk that should be the “system disk”.)
Type Select Disk 0 (or whatever disk it is for your application)
Type List Part (this lists partitions)
Type Select Part 1
Type Detail Part
So now, I can access my disk without having to type in the recovery key every time, but it still won’t boot. After looking around a bit more in DiskPart, I noticed that the E: drive (thumb drive that had the .bek file for unlocking the C: drive) was set to “active”. An active partition is required for boot. The E: drive being “active” shouldn’t have been the case in this scenario. Also, the “system” partition was the C drive, which didn’t raise any red flags when I saw it at the time, but this was also a big part of the issue.
Note: When using DiskPart, “Detailing the Partition” will tell if the selected partition is active or not; also the “Info” section will tell you if it’s a “system” drive or not.
When I selected Disk 0, it only had one partition, which was the system partition. The E: drive being the active drive and the C: drive being the system drive was likely set that way due to my use of the bootrec.exe command and the “startup repair” feature in the Windows Recovery Environment (It’s a GUI option, but you can also kick it off by going to X:sourcesrecoverystartrep.exe). It created a system partition since one couldn’t be located. In my case, when it “fixed” everything, it just made things worse – I’ll explain in a bit.
So what I did next will still likely be helpful to some for some scenarios, but in my case, it didn’t help. So as noted earlier, I noticed that the C drive wasn’t the “active” partition, so I went and set the “system” partition to be “active”. I did this in DiskPart, essentially following the steps outlined above in the notes, but once partition 1 was selected I typed “Active”. This made that partition active, so now the C drive was “active” and the “system” drive, but there was no boot data there. When you type bcdedit, it showed the E: drive as the device that was the Windows Boot Manager. To fix that, I ran bootrec /RebuildBCD. The following KB article details what the bootrec command does: http://support.microsoft.com/default.aspx?scid=kb;EN-US;927392. In my case, I didn’t need to export settings and rename anything, because nothing was there. At this point, I just changed everything to use C: drive and to have boot configuration data reflect that in an effort to merely get it to boot. So now the C: drive is the “system”, “boot”, and “active” among other things, and re-running bcdedit now reflects this. So I thought I was all set and rebooted. It failed to boot yet again, however the error was different… This time it said: “Remove disks or other media; Press any key to restart”. In doing some research, that error is the equivalent in Windows 7 to what “NTLDR is missing; Press any key to restart” is to Windows XP. That was promising and lead me down a number of other research trails, but nothing was of any value.
So now, just for fun, I went back into the Windows Recovery Environment and ran the “Startup Repair” again. This time however it essentially said that nothing was wrong and that it should have booted. At this point, I was running out of ideas. It was either restore from backup or create a parallel install. In looking into restoring from backup, I learned that the hardware that I’d backed my machine up to had failed…awesome. So now the only option was to try to dual boot it and see if I could choose the initial installation.
Ok, so I booted to the media, choose the option to Install, I selected the disk, it warned me that I would overwrite some system files etc, I didn’t care and clicked next. Expecting to be happily on my way to completing a parallel install, I was greeted with the following error message “setup was unable to create a new system partition or locate an existing system partition”… I couldn’t have been more elated.. Fortunately error logging is recorded in theX:WindowsPanther folder in the form of SetupErr.Log and SetupAct.log among others. SetupErr.log was a very short one-line summary of the details found in SetupAct.log. Below is the pertinent information that I found in the SetupAct.log file:
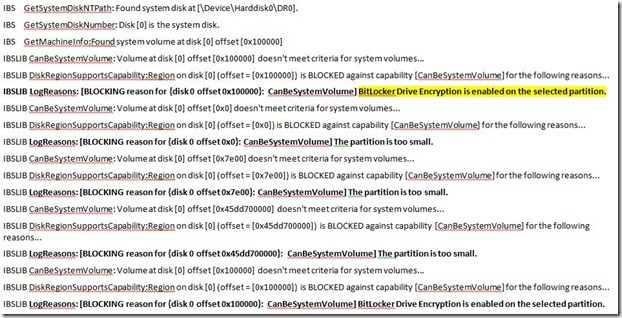
Finally, a relevant clue! The other “LogReasons” were pretty much invalid since there was plenty of space, so I pointed the finger at BitLocker. After seeing that though, something clicked and everything started to make sense. Sadly, just three months ago, I’d been working on an enterprise BitLocker test case/project for one of my customers and I’d covered all of the requirements with them multiple times…to include the partitioning requirements and how to use the BitLocker Drive Preparation tool. In Windows Vista and 7, two NTFS partitions are required, creating a “split-load” configuration, one partition for the “System” volume and one for the “Operating System” volume. The “system volume” in this case also needs to be set to “active” and must be unencrypted. It also contains the boot information. More information on what changes when BitLocker is enabled can be found in the “Description of the BitLocker Drive Preparation Tool” –http://support.microsoft.com/kb/933246. Just as a side note, the requirements for Windows 7 change a bit and the tool is built-in, and automates what used to be a separate procedure. Updated information for Windows 7 requirements can be found here – http://technet.microsoft.com/en-us/library/dd875534(WS.10).aspx.
Anyhow back to the issue; since I was already booted into the Windows Recovery Environment, I just opened up a command prompt and proceeded to decrypt the drive. To do that I typed manage-bde -off C: and then just let it sit there until it finished.
Note: If you want to look at the decryption status you can type manage-bde -status C:
Once it was decrypted, I rebooted, and then it booted right into Windows! It was funny because as it was coming up, it said not to reboot the box because it was finishing the installation of the updates that prompted the reboot that never made it back into Windows. After I was back in there, I re-encrypted the C: drive which prompted the now built-in, drive prep tool to kick off and create the required boot partition. Below is an example what a functional machine with the BitLocker partition in places looks like:

Also of note was that before I re-encrypted the C: drive, I’d plugged my fixed data drive back in, which was also encrypted. I entered the password in to unlock it, and then checked the box to allow “auto-unlocking” from this machine. It failed and said that the operating system volume had to be encrypted for this feature to work. I re-encrypted the C: drive and tried it again, but now it failed with a CRC error. I didn’t get any further detail when trying to set autounlock from the command line, and the only other bit of data is an error in the System Log – Source: Bitlocker-Driver, Event ID 24591 that only says: “Auto-unlocking failed for volume <Drive Letter>:.” I found nothing on this error. I ended up just de-crypting and re-encrypting the data drive and now everything works great.
On a closing note, I have no idea what root cause was, I just know that the BitLocker partition was gone and I hadn’t changed anything in regards to disk partitions. All I did was reboot after installing Windows Updates, but I can’t blame the updates as I can’t prove anything. Either way, this issue took me most of the day to figure out, so I thought I should blog about it in hopes of helping someone else.